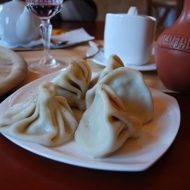
Khinkali with Lamb and Tail Fat
Main Dishes | Georgian cuisine
⏳ Time
30 minutes
🥕 Ingredients
6
🍽️ Servings
4
Description
It is believed that in the mountains, lamb for khinkali is not ground in a meat grinder (there it is called a machine), but finely chopped with a huge dagger. When we saw that the mountain people happily grind meat in a meat grinder, we asked, 'Don't you do it with a knife?' They replied, 'It's more convenient this way.' They also say that in the mountains, no greens are added to the filling — this is also untrue. In summer, all the greens from the garden go into the filling. It's just that in winter, they have nothing. In the mountains, a glass of crushed garlic and water is placed in front of each diner, along with a teaspoon. A person takes the khinkali by the knot, takes a bite, and pours a teaspoon of garlic into the hole. The knot is not eaten but left on the plate. Khinkali are addictive. We have a friend who cannot live without them — he must eat his portion at least once a week. When we were hungry students, we could eat up to 10 khinkali at once. But before the khinkali, we would also order shashlik and kebabs. Nowadays, we eat less but more often. In Georgia, khinkali are mainly eaten in the morning — around noon, for a late breakfast. Khinkali also go very well with a shot of vodka for a hangover.
Ingredients
- Onion - 3 heads
- Lamb - 17.6 oz
- Wheat Flour - 2 cups
- Fat Tail Fat - 1.8 oz
- Ground Black Pepper - to taste
- Ocean salt - to taste
Step by Step guide
Step 1
Chop the onion and meat into small pieces. Pass them through the meat grinder together. It is better to take meat with some fat so that the filling turns out juicy. If the lamb is a bit tough, you can add some tail fat to the filling — it will become juicier.
Step 2
Add pepper, salt, and pour in warm water — enough to be absorbed by the filling (about half a cup). Knead the filling thoroughly for about ten minutes so that the meat is evenly soaked with water.
Step 3
The dough is very simple: you need water, flour, salt — and that's it. You also need experience. For example, the first time, you might get perfect dough, and the second time — not so much. Sift the flour onto a wooden board — it's better to use coarse second-grade flour. Gather the flour into a mound, pour in a cup of water, add salt, and knead a soft dough. The dough should not be kneaded for long; it is a quick process.
Step 4
Then, you need to roll out the dough into a thin layer (3–5 mm thick) and cut out circles the size of a saucer. But we don't have a suitable shape, so we roll out the dough into a slightly thicker pancake, cut it with a glass, and then roll each one out again to make it larger and thinner — otherwise, they will turn out like dumplings, not khinkali.
Step 5
Place 1 tablespoon of filling in the center of each circle, and, gathering the edges into pleats, twist the dough at the top into something resembling a pouch. This top part is called the knot. No one really knows how many pleats a khinkali should have.
Step 6
One by one, drop the khinkali into salted boiling water and cook on low heat for 10–15 minutes. From time to time, gently stir the khinkali with a spoon so they don't stick to the bottom. After the khinkali float to the surface, keep them on the heat for another 3–5 minutes, then fish them out with a slotted spoon. Serve the khinkali with black pepper.
Cooked This Dish? Share Your Delicious Creation with the Community! 🥰
Snap a photo and let everyone see your culinary masterpiece. Inspire others and showcase your skills!
Users Photos
No photos yet
Leave a Comment
Please log in to leave a comment.