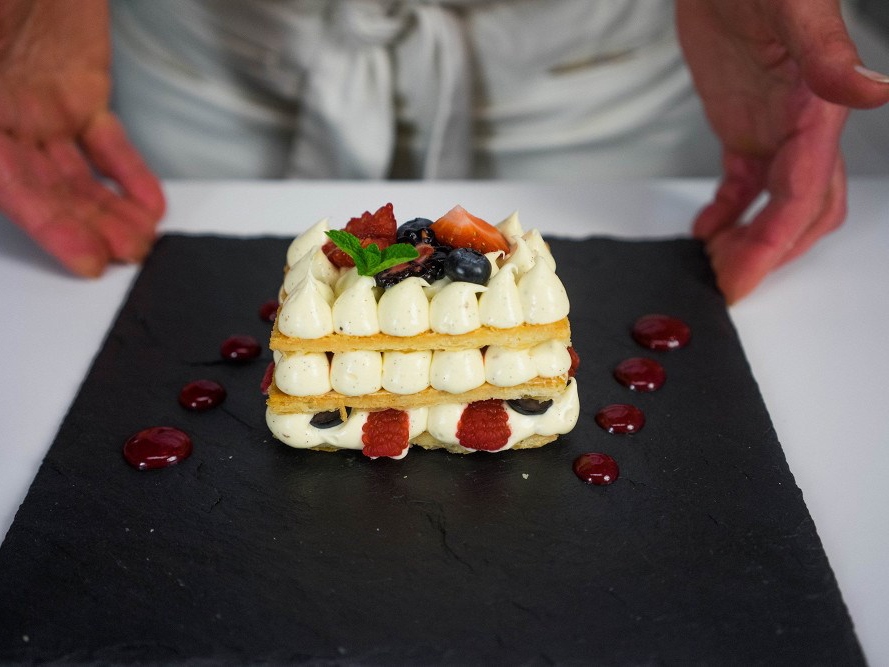
Millefeuille with Berries
Baking and Desserts | French cuisine
⏳ Time
5 hours
🥕 Ingredients
11
🍽️ Servings
8
Description
Millefeuille is unfortunately not very common in our country, but one of its forms is familiar to us all. This is the 'Napoleon,' which is separated from millefeuille by one mistake. A fatal one, from the perspective of a French pastry chef, but completely non-critical for those who prefer soft, raw, fluffy layers oozing with cream over crispy ones. This metamorphosis is inevitable if you do not eat the millefeuille immediately and let it sit for half a day to soak.
Ingredients
- Wheat Flour - 14.1 oz
- Citric Acid - 0.1 oz
- Butter - 8.8 oz
- Sugar - 12.3 oz
- 33% Cream - 7 fl oz
- Whole egg - 5 pieces
- Vanilla Pod - 1 piece
- Gelatin - 0.4 oz
- Mascarpone Cheese Unagrande - 7.1 oz
- Fresh Berries - to taste
- Salt - 0.1 oz
Step by Step guide
Step 1
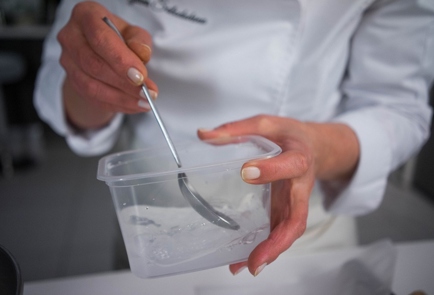
The dough for millefeuille should be the same as that for croissants. You can buy ready-made puff pastry, but it's better to make it yourself to ensure the quality, flavor, and ingredients. Industrial producers often use margarine and palm oil instead of butter. Pour 375 grams of flour into the mixing bowl. Then take 165 ml of water, dissolve 2 grams each of salt and citric acid in it. Add the water to the flour and crack an egg into the dough.
Step 10
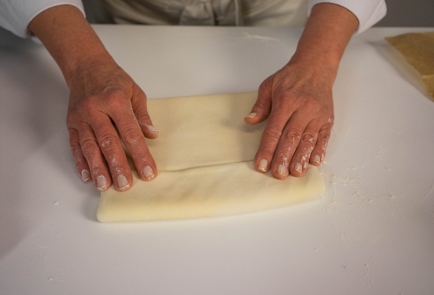
Fold the dough. To do this, mentally divide it into three parts. Fold the first two parts together, leaving one third of the dough, which you will fold in half. This will create a sort of book, with one part larger and the other smaller. If you fold the dough symmetrically, the center will get squished during the subsequent folds.

Step 11
Fold the resulting sheet of dough in half. From the side, it should look like the picture. These are the first four layers. Place the dough in the refrigerator for 30 minutes. Then take it out, roll it out to a thickness of 1 cm, fold it in the same way, and return it to the refrigerator. Repeat this process two more times.
Step 12
In the end, you will have dough with 256 layers. This dough can be stored in the refrigerator for a week and in the freezer for about three months. Besides making mille-feuille, you can use it to prepare puff pastries, pies, and cakes. It should be cut with a very sharp knife or a pizza cutter to avoid sealing the layers.
Step 13
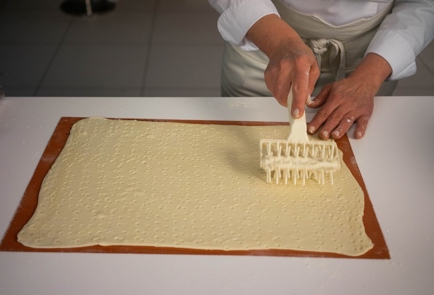
Roll out the dough in the shape of the baking tray to a thickness of no more than 5 mm. Prick the dough: this is necessary to prevent it from puffing up like a pillow while baking and to ensure that the layers stick together in places. Place the dough in an oven preheated to 392°F and bake for about 20 minutes. The dough should turn golden brown on both sides. To prevent it from puffing up, it needs to be flipped. This is not difficult: when the surface begins to turn a golden color, open the oven, quickly flip the dough so the browned side is facing down, and let it continue baking. It will take about 10 minutes in the oven on each side. Allow the finished crust to cool.
Step 14
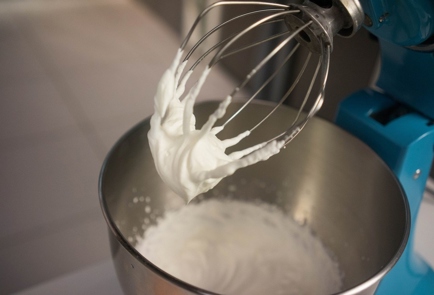
While the dough is baking, prepare the cream. Whip the cold heavy cream on high speed with a mixer until soft peaks form; this will take about 5–7 minutes. Place the whipped cream in the refrigerator to prevent it from deflating.
Step 15
Start whisking the egg yolks. Add the seeds from one vanilla pod to the yolks. Do not discard the pods; you can add them to the sugar syrup while cooking, and it will become vanilla-flavored with a pleasant caramel hue.
Step 16
While the egg yolks are being whipped with vanilla, prepare the sugar syrup. Dissolve 100 grams of sugar in 80 ml of water, bring to a boil, reduce the heat, and simmer until the syrup reaches a temperature of 241°F. While the syrup is cooking, let the egg yolks continue to be whipped; they will be fine.
Step 17
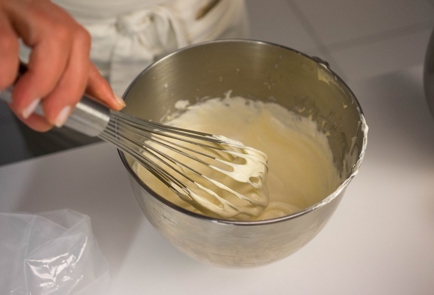
Without stopping to whip, add the hot syrup to the egg yolks, followed by the gelatin (previously soaked in cold water and squeezed dry). Then add the mascarpone and whip until everything is smooth and homogeneous. Make sure that the mascarpone does not remain stuck to the sides of the mixing bowl. If necessary, stop the mixer, scrape down the cream with a spatula, and then continue whipping.
Step 18
Add the whipped cream to the mixture and gently fold everything together using a spatula or whisk. Be careful to mix from the bottom upwards to avoid deflating the cream. Place the mixture in the refrigerator for 1 hour.
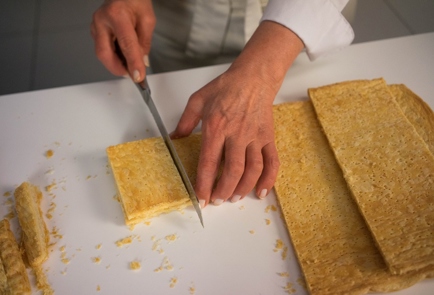
Step 19
Cut the cold cake. Start by trimming the edges, as they may be uneven. You can crumble the trimmings to use as a topping, or simply enjoy them. For individual servings, slice the cake into small rectangles of equal size.
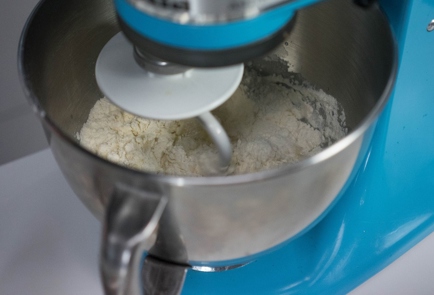
Step 2
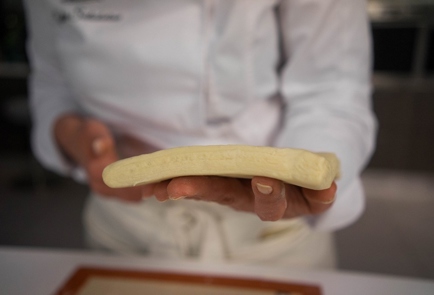
Place the dough in a mixer with a hook attachment to knead for 10 minutes. Start on a low speed until all the ingredients come together, then you can increase the speed. Once the dough is ready, knead it by hand, wrap it in plastic wrap, and refrigerate for at least 30 minutes.
Step 20
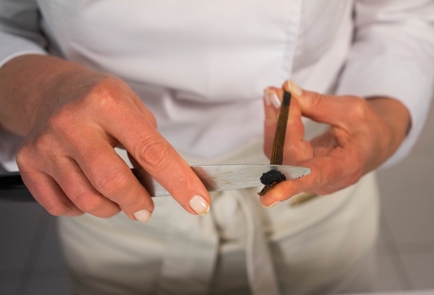
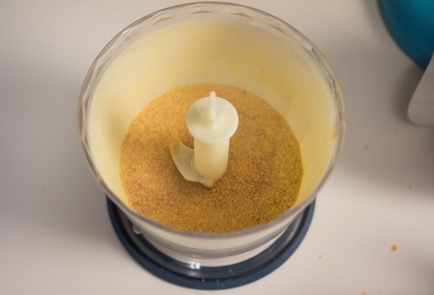
Crush the caramel - break it into medium-sized pieces by hand and blend it in a blender. The result should be caramel powder.
Step 21
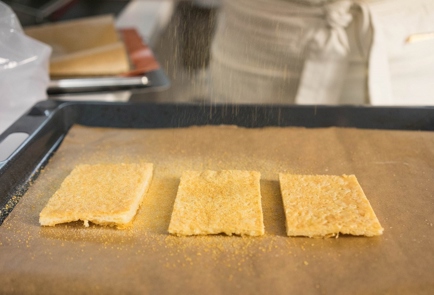
Place the cakes on a baking sheet and sprinkle a thin layer of caramel through a sieve. The caramel is meant to create a delicate crispy layer on the cakes for texture, not for flavor. Bake in an oven preheated to 428°F for a few minutes. It is preferable to use the top heating element. As soon as a lightly browned crust forms, remove them from the oven; do not overcook the caramel, as it will burn and ruin the cakes. A very thin crust that has just set is needed. Allow the cakes to cool.
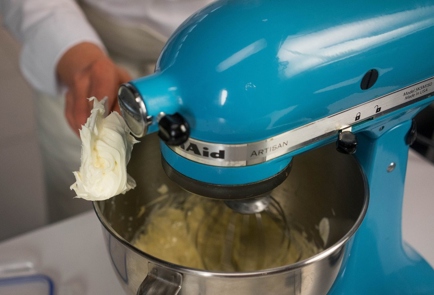
Step 22
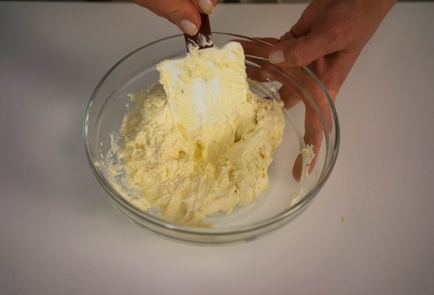
Remove the cream from the refrigerator; it will be quite fluffy. Mix it with a spatula until smooth. Transfer the cream to a piping bag fitted with a round nozzle.
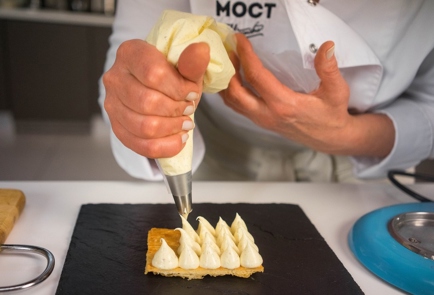
Step 23
Choose one layer and transfer it to a serving plate. You can add a bit of cream underneath to prevent it from sliding around. Pipe peaks of cream onto the first layer. If the cream spreads, it means that either it or the layers are not cold enough. For the mille-feuille to hold its shape and remain intact, all the ingredients must be cold.
Step 24
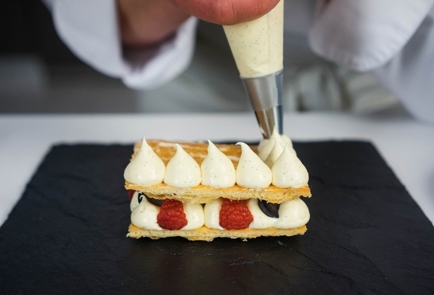
Place pieces of berries on the cream. They should not be larger than the peaks of the cream; otherwise, the second layer will rest on the berries instead of the cream. Cover the cream with the second layer. It should not press down too hard on the bottom layer. Also, pipe peaks of cream onto the layer.
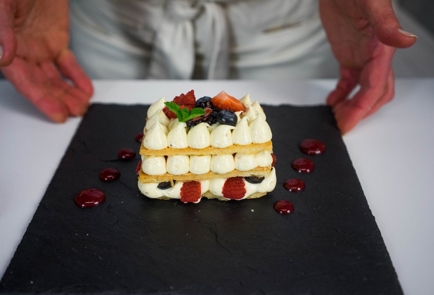
Step 25
Cover the cream with the third layer of pastry, and decorate it with cream and berries. The assembled millefeuille should be served and eaten immediately. If you put it in the refrigerator, the layers will soak up the cream and it will turn into a 'Napoleon'.
Step 3
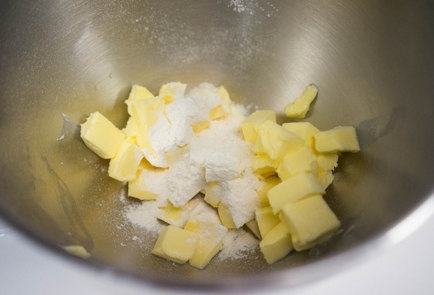
Meanwhile, prepare the butter that will be used to layer the dough. Cream the softened butter with 25 grams of flour until smooth. The flour is needed to bind the butter to the dough, allowing it to adhere better.
Step 4
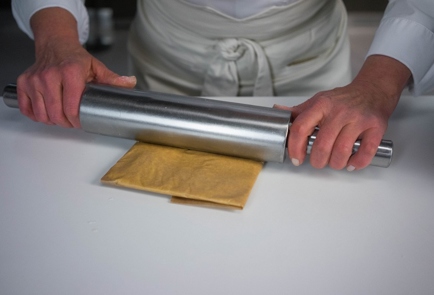
Place the butter mixture onto parchment paper and spread it into a thin layer to form a square. Wrap it completely in the paper. Roll it out with a rolling pin several times on the parchment until the mixture is flat and thin, no more than 5–7 mm thick. Put the butter in the refrigerator and keep it there until it hardens, which will take about 1 hour.
Step 5
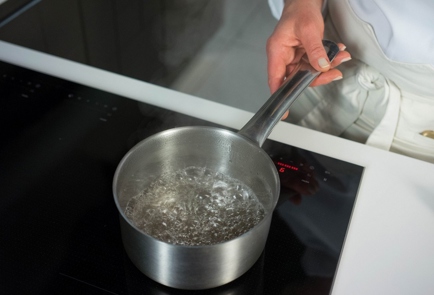
While the dough rests in the refrigerator, prepare the caramel. Pour 250 grams of sugar into a saucepan and place it over medium-high heat. Carefully monitor what happens at the bottom of the saucepan, as this is where the sugar will begin to melt. Do not stir the mixture with a whisk or spatula, as this can cause the sugar to crystallize later on. However, since the caramel does need to be stirred, simply give the saucepan a gentle shake.
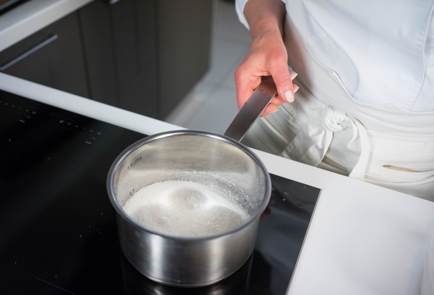
Step 6
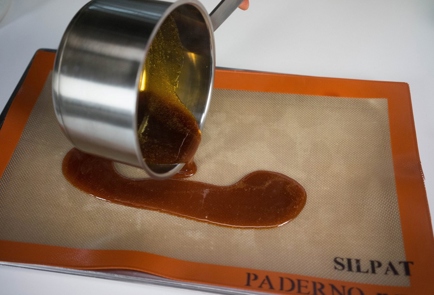
After 10–15 minutes, the sugar will turn into caramel. Make sure to watch that the sugar doesn't burn; if it does, reduce the heat. Pour the finished caramel in a thin layer onto a silicone mat and let it cool.
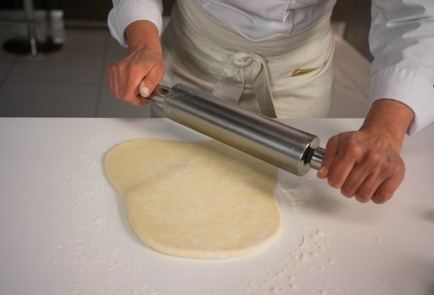
Step 7
Take the dough out, lightly roll it out, and then continue rolling it so that the center is thicker and the edges are thinner, resembling petals. Stretch the corners of the dough so that you can later cover the butter with them. The working surface and rolling pin should be cold. You can even place the rolling pin in the refrigerator for this. The optimal room temperature is between 15-63°F, which is quite cool. In winter, you can open a window, and in summer, turn on the air conditioning. This is necessary to prevent the butter from starting to melt. If the butter melts, the dough will begin to tear and stick to the countertop.

Step 8
Take out the chilled butter. Check if it fits in the center of the dough and if the edges completely cover it. If not, set the butter aside and roll out the dough more or stretch it by hand. Wrap the butter in the dough like an envelope. The edges of the dough will overlap to cover the butter; press them tightly together.
Step 9
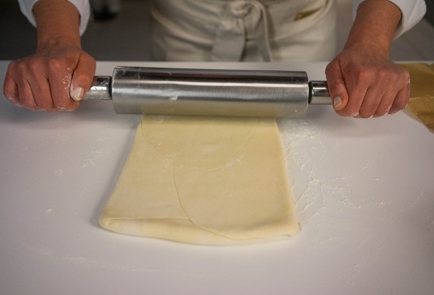
Roll the dough into a rectangle in two directions — away from you and towards you, but not across. The final thickness should be about 1 cm. The length of the piece of dough should be approximately four times its width. Everything needs to be done quickly because the butter melts. Remove any excess flour from the surface.
Cooked This Dish? Share Your Delicious Creation with the Community! 🥰
Snap a photo and let everyone see your culinary masterpiece. Inspire others and showcase your skills!
Users Photos
No photos yet
Leave a Comment
Please log in to leave a comment.